Learning how to polish marble by hand can restore a tired surface without removing its natural character. The process rewards patience, careful observation, and a light touch. Marble is softer and more sensitive than many people expect. Its finish can change because of mineral content, previous sealers, stains, or tiny scratches.
This guide explains the practical steps used by experienced stone-care professionals. You will learn how to inspect the surface, choose suitable abrasives, control water, and build a smoother finish gradually. A clean microfiber cloth, diamond polishing pads, fresh water, and proper eye protection are essential. Test every product on a hidden area first. Even a trusted polishing compound may react differently on pale limestone-based marble.
Small movements matter. Work in overlapping circles, keep the surface damp, and remove residue often. Never rush the final polishing stage. Heat from friction can dull the stone or leave uneven marks. That happened during one of my early attempts. I pressed too firmly and created a cloudy patch that required extra refining. It was avoidable.
Expect variation. Some marble develops a soft satin glow, while denser stone can reach a sharper reflection. The goal is not always a mirror finish. A consistent, clean surface usually looks more professional than an overly glossy section beside dull areas. With measured pressure and realistic expectations, hand polishing becomes controlled maintenance rather than guesswork. When damage reaches deep below the surface, consulting a qualified stone restoration specialist remains the more reliable choice.
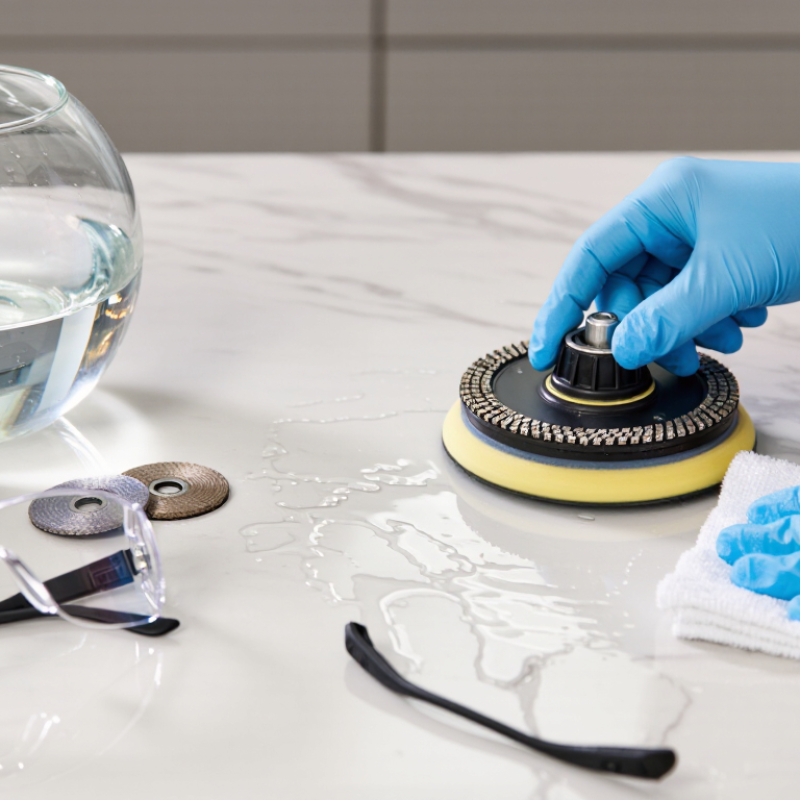
Before polishing marble by hand, inspect the surface under bright, angled light. This reveals dull patches, shallow scratches, etching, stains, and loose edges. Run clean fingertips across the stone to feel uneven areas. Do not rely on appearance alone. A surface may look smooth while holding fine grit.
Check whether the marble has a coating, sealant, or previous repair. A small test area in a hidden corner can prevent wider damage. Avoid polishing cracked, deeply chipped, or unstable marble without professional assessment. Moisture can also expose problems. If dark marks spread after wiping, the stone may need drying before any abrasive work. I once polished too quickly and missed a faint acid mark near an edge. The result looked uneven.
Gather a spray bottle with clean water, pH-neutral stone cleaner, microfiber cloths, soft white pads, and wet-dry polishing papers made for stone. Use several grades, from coarser to finer, rather than forcing one abrasive to work harder. Keep a separate bucket for clean water. Fine grit can scratch marble again. Wear protective gloves and eye protection, and keep the work area free from dust and loose particles. Test every tool gently. More pressure is not better. Use a small hand mirror or angled lamp to check progress from different directions. Lighting can be misleading.
Begin with a clean, dry surface. Dust can create new scratches during hand polishing. Use a soft microfiber cloth and a pH-neutral stone cleaner. Rinse with clean water, then dry the marble completely. Avoid vinegar, lemon juice, and abrasive powders. They can dull the surface or leave pale etch marks.
Inspect the marble under bright, angled light. Small scratches often appear as thin white lines. Lightly wet the area and work with a fine diamond hand pad. Use gentle, even strokes in one direction. Keep the pad damp, but do not flood the stone. For shallow etching, apply a small amount of marble polishing compound with a soft cloth. Follow the product instructions carefully. Results may vary by marble type. I have found that rushing this stage creates uneven shine. A second, slower pass usually looks better.
Tips: Test every method in a hidden spot. Use light pressure. Wipe away residue often. Stop if the surface feels warmer or looks patchy. Minor chips may need professional stone repair, especially near edges or seams. Wear eye protection and gloves while working. Never polish over grit, loose dust, or trapped moisture.
Hand polishing marble depends on controlled abrasion, not force. Clean the slab first and remove loose grit. Begin with 120-grit wet abrasive to level dull patches or shallow scratches. Keep the surface damp, but avoid flooding the work area. Move in overlapping circles, then change direction between stages. Progress through 220, 400, 800, 1500, and 3000 grit. Do not skip grades. Each finer abrasive should remove the marks from the previous one. Wipe the marble after every stage and inspect it under angled light. The surface may look polished while hidden scratches remain. I sometimes stop one grit too early. That mistake becomes obvious after drying.
Wet sanding reduces airborne dust, yet it does not remove every hazard. OSHA’s respirable crystalline silica rule sets an eight-hour exposure limit of 50 micrograms per cubic meter, with a 25-microgram action level. Marble usually contains less silica than many stones, but dust control still matters. Wear eye protection, gloves, and a suitable respirator. Use clean water and separate buckets for each grit. According to the Natural Stone Institute’s technical guidance, acidic cleaners can damage calcite-based stone. Use a neutral stone cleaner instead.
Tips: Test the sequence on an unseen edge. Press lightly. Let the abrasive work. Replace clogged sheets immediately. If the finish looks cloudy, repeat the last two grits rather than applying more pressure. A soft microfiber cloth reveals remaining haze. Mistakes are useful here; they show where your process needs more patience.
Polishing marble by hand depends on steady, controlled circular motions rather than heavy pressure. I work on a clean, damp surface and divide it into sections of roughly 30 centimeters. A soft microfiber pad helps spread the polish evenly. I move clockwise for several passes, then reverse direction. This prevents faint swirl patterns from becoming visible under angled light.
The Natural Stone Institute’s Dimension Stone Design Manual describes polishing as a progressive abrasive process. I therefore begin with a suitable fine-grit pad and advance gradually through finer grades. Each stage should remove the previous scratches before moving forward. I keep the pad flat and slow down near edges, where excessive pressure can round the profile. I once pressed harder to speed the work. That created uneven gloss, so patience matters more than force. OSHA’s respirable crystalline silica standard sets an eight-hour exposure limit of 50 micrograms per cubic meter. Wet polishing, ventilation, eye protection, and a properly fitted respirator remain important controls.
Tips: Use a spray bottle for light moisture, not flooding. Check the surface after every few passes with a clean cloth. Stop if the polish dries into streaks. Test an inconspicuous area first, because marble hardness and porosity vary. A slight dull patch may require repeating the previous abrasive stage, not adding more polish.
| Step | Polishing Stage | Recommended Materials | Controlled Hand Technique | Typical Time | Expected Result |
|---|---|---|---|---|---|
| 1 | Clean and Inspect | pH-neutral stone cleaner, clean microfiber cloth, soft brush | Remove dust, grit, grease, and loose particles. Inspect the surface for stains, etching, chips, or deep scratches before polishing. | 10–20 min | A clean surface with no loose debris that could cause additional scratches. |
| 2 | Protect the Work Area | Painter’s tape, plastic sheeting, clean water, safety glasses | Mask adjacent surfaces and keep abrasive particles away from nearby flooring or furniture. Wear eye protection and use ventilation when working with polishing powder. | 5–10 min | Reduced risk of splashes, dust, and residue affecting surrounding areas. |
| 3 | Test a Small Area | Marble sample or hidden test spot, selected polish or fine abrasive | Apply the intended method to a small inconspicuous area first. Check the color, sheen, and surface texture after rinsing and drying. | 15–30 min | Confirmation that the process is suitable for the specific marble finish. |
| 4 | Remove Light Surface Marks | Fine wet/dry diamond hand pad or marble-safe abrasive pad, water | Dampen the area and work with light, even pressure. Move the pad in overlapping circular motions, keeping the surface wet and checking progress frequently. | 5–15 min per sq. ft. | Reduced appearance of light scuffs and a more uniform surface. |
| 5 | Apply Marble Polish | Marble polishing powder or cream labeled for calcareous stone, soft cloth or felt pad, water | Use a small amount of polish on the damp surface. Rub in controlled circular motions with moderate, consistent pressure. Work in sections of approximately 1–2 sq. ft. to maintain even coverage. | 3–8 min per section | The surface begins to develop a clearer, smoother sheen without visible application lines. |
| 6 | Refine the Finish | Clean polishing cloth or finer finishing pad, fresh water | Continue with lighter pressure and smaller overlapping circles. Avoid holding the pad in one place, which can create uneven gloss or localized heat. | 2–5 min per section | More consistent gloss and a smoother feel across the polished area. |
| 7 | Rinse and Neutralize Residue | Clean water, microfiber cloths, pH-neutral stone cleaner if needed | Wipe away residue with clean water, changing cloths as they become dirty. Do not use vinegar, lemon juice, or other acidic cleaners on marble. | 5–10 min | A residue-free surface without acidic damage or powder haze. |
| 8 | Dry and Evaluate | Dry microfiber towel, bright side lighting | Dry the marble completely and inspect it from several angles. Repeat only the necessary section if the sheen is uneven; avoid excessive abrasion. | 10–20 min | A dry, smooth finish with consistent light reflection. |
| 9 | Maintain the Finish | Microfiber cloth, pH-neutral stone cleaner, absorbent towel | Wipe spills promptly, use coasters or mats, and clean regularly with a marble-safe neutral cleaner. Avoid abrasive powders and acidic household products. | Routine care | Longer-lasting appearance and reduced risk of etching, staining, and dull spots. |
How to Polish Marble by Hand for a Smooth Finish
Hand polishing becomes valuable after cleaning, especially where dull patches catch side light. Begin with a clean, dry surface. Use a fine polishing powder and a damp microfiber cloth. Work in small circles, applying steady pressure rather than force. Excessive pressure can create uneven gloss or warm the stone. Keep the cloth moving. A soft, even sheen matters more than a mirror-like spot.
The U.S. Geological Survey’s Mineral Commodity Summaries 2024 reports approximately 1.4 million metric tons of U.S. dimension-stone production in 2023. That scale reflects marble’s continuing construction value, but every slab still needs individual care. Stone varies in hardness, porosity, and previous treatment. The Natural Stone Institute’s Dimension Stone Design Manual also emphasizes testing procedures before broad application. I sometimes polish too quickly and miss a cloudy edge. A low-angle flashlight reveals these defects better than normal room lighting. Stop, rinse away residue, and inspect again.
Tips: Test the method on a hidden area first. Use pH-neutral water for cleanup. Avoid vinegar, lemon, abrasive powders, and rough pads. Apply a penetrating sealer only after the marble is fully clean and dry. Sealer reduces staining, but it does not prevent acid etching. Wipe spills immediately, especially coffee, wine, and oily food. Use a clean cloth for the final buff. Small mistakes remain visible. That is why patience protects the finished marble finish.
Start with a coarser abrasive only when needed to remove scratches, keep the marble surface wet, and move through the grades in order. Finer abrasives create progressively smaller scratches and a smoother appearance. After the final polishing step, buff the surface with a clean pad and apply a marble-appropriate protective sealer according to its instructions. The particle sizes shown are approximate nominal values associated with common FEPA P-grade abrasives.
Work on a clean, damp surface in sections about 30 centimeters wide. Use controlled circular motions with a soft microfiber pad. Work slowly.
No. Use steady pressure instead of force. Heavy pressure can create uneven gloss, warm the stone, or round its edges. I once pressed harder and regretted it.
Move clockwise for several passes, then reverse direction. This helps prevent visible swirl marks under angled light. Check the surface often.
Start with a suitable fine-grit pad and advance gradually. Each stage should remove the previous scratches before you continue. Do not skip grades casually.
Stop polishing and inspect the area with a clean cloth. Add light moisture with a spray bottle, not flooding. Streaks need correction, not more pressure.
Use a low-angle flashlight across the marble. Side lighting reveals cloudy edges and uneven gloss. A normal room light can hide defects.
Use wet methods, good ventilation, eye protection, and a properly fitted respirator. Avoid creating airborne stone dust. Protect your breathing.
Apply a penetrating sealer only after the surface is completely clean and dry. Sealer can reduce staining, but it cannot prevent acid etching. Test a hidden area.
Avoid vinegar, lemon, abrasive powders, and rough pads. Use pH-neutral water and clean microfiber cloths. Small mistakes remain visible.
Wipe coffee, wine, and oily food immediately. Keep a clean cloth nearby for quick cleanup. I sometimes wait too long, and that is a mistake.
How to polish marble by hand begins with carefully assessing the surface for stains, scratches, dull areas, and deeper damage. Gather soft cloths, clean water, suitable marble-safe abrasives, polishing powder, gloves, and a spray bottle. Clean the marble thoroughly to remove dust and residue, then address minor imperfections with gentle spot repairs. Avoid harsh cleaners or excessive pressure, as marble can be easily etched or scratched.
Sand the surface by hand using progressively finer abrasives, working evenly and patiently until the finish becomes smooth and uniform. Apply marble polish with controlled circular motions, focusing on small sections and keeping the surface slightly damp when appropriate. Once the desired shine appears, buff the marble with a clean, soft cloth to remove residue and enhance its clarity. Finally, protect the finished surface by keeping it dry, wiping spills promptly, and using gentle maintenance methods to preserve the smooth, polished appearance.

Gem Marble