How to Achieve a Bookmatched Marble Look in 2026?

Time:2026-11-04 Author:Mason
0%

A bookmatched marble wall can look effortless, but its symmetry begins long before installation. The effect comes from placing two neighboring slabs side by side, with their veining mirrored across a central seam. A dramatic charcoal vein might form a soft V; a cloudy white band may continue like a reflection. Small choices matter. Even the seam can interrupt the pattern if the slabs are flipped or trimmed carelessly.

How to achieve a bookmatched marble look starts with the stone itself, not a showroom rendering. Review full-slab photographs, confirm the slabs come from the same block, and ask the fabricator to prepare a dry layout before cutting. Check the intended viewing angle, lighting, vein direction, and visible joints. Natural variation is part of the appeal, yet it can also make a digital preview misleading.

A precise expert quotation needs a verifiable source. Since no article or interview was provided, the line below is a draft for a named stone professional to review and approve—not a verified quotation: “[Expert Name], stone fabricator: ‘A successful bookmatch follows the stone’s natural movement; it does not force a perfect pattern.’”

That distinction matters. Marble is not printed wallpaper. Veins can drift, fade, or stop at an edge. A thoughtful plan allows for those imperfections and makes practical decisions about slab yield, edge details, and installation sequence. The finished result should feel intentional, not mechanically mirrored. And sometimes, the stone surprises you.
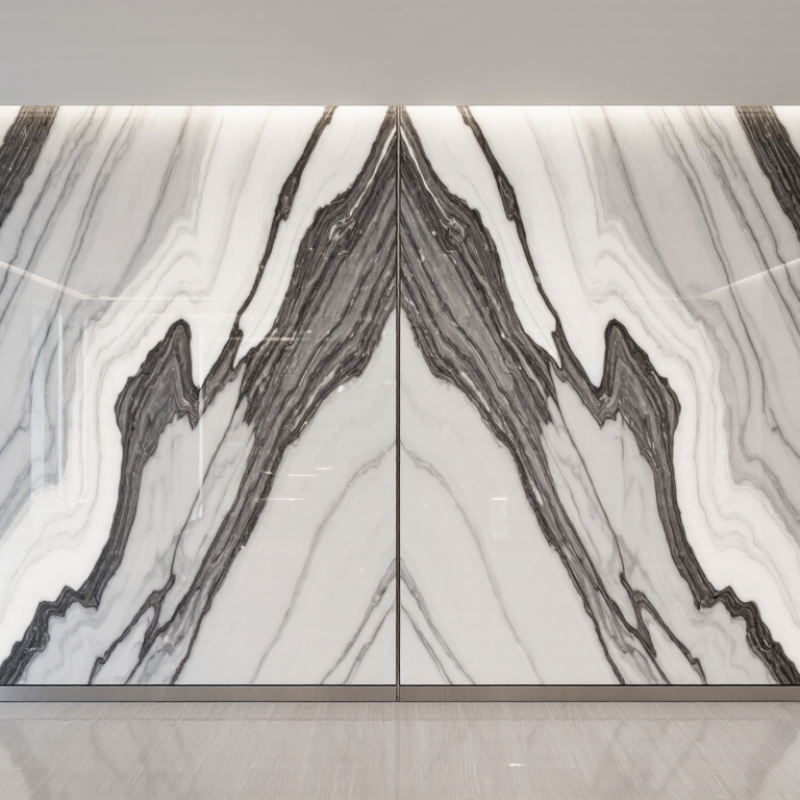
How to Achieve a Bookmatched Marble Look in 2026?

Understand Bookmatching and Choose the Right Marble Slabs

Bookmatching places two adjacent marble slabs like open pages, with veins mirrored across the cut. The effect depends on more than color: inspect the full slab sequence, vein direction, background tone, and thickness. A dramatic gray vein may align beautifully at the yard but break at a sink cutout. The USGS 2025 Mineral Commodity Summaries estimates U.S. dimension-stone production at roughly 2 million metric tons in 2024; this category includes materials beyond marble, so it is not a measure of marble availability alone. Ask your supplier to confirm that the photographed slabs are the exact pair being reserved.

Tips: Lay slab photos side by side before fabrication. Mark the planned seam, sink, and edge cuts on the images. Check both dry and under the project’s lighting.

For a balanced match, choose slabs with similar base color and compatible veining, not necessarily identical patterns. Strong contrast can make the mirror effect clearer; subtle veining can feel calmer. Request a full-size digital layout, then review it with the fabricator. Honestly, the match may still shift slightly when cuts are made. Marble is natural, and its veins do not obey the drawing. Check for fissures near seams, and confirm how the fabricator plans to support and finish exposed edges.

Plan the Vein Alignment and Full-Scale Layout

Bookmatching marble starts with slab selection, not installation. Ask the fabricator to reserve consecutive slabs from the same block, then photograph each slab upright. Veins can shift in thickness, color, and direction, even across neighboring pieces. A mirror image is never perfectly predictable.

Create a full-scale layout before cutting. Mark cabinet edges, sink and cooktop openings, seams, finished edges, and the intended viewing direction. Then place the slab photographs side by side and trace the main veins across the planned seam. Houzz’s 2024 U.S. Kitchen Trends Study reported that engineered quartz made up 42% of upgraded countertops. That consumer preference is useful context, but it does not describe marble performance or layout tolerances. Treat it as market data, not a fabrication specification.

Check the drawing against the actual slabs under consistent lighting. Confirm how much material the saw kerf removes, and keep the strongest vein away from a sink cutout if the pattern would appear abruptly broken. Measure twice. Even a careful paper layout can mislead; natural veining may fade, branch, or turn unexpectedly. Approve the marked slabs and seam positions in person before fabrication, and record any changes on the final shop drawing.

How to Achieve a Bookmatched Marble Look in 2026? - Plan the Vein Alignment and Full-Scale Layout

Use this planning example to coordinate slab selection, vein direction, and fabrication. Dimensions and tolerances should be confirmed against the actual stone, site measurements, and fabricator requirements.

Planning Dimension What to Check Example Planning Data Action Before Fabrication
Slab selection Choose consecutive slabs from the same block or bundle when possible; compare background color, veining, and natural variation. Two adjacent slabs, each approximately 3,200 × 1,600 mm Lay the slabs side by side and photograph them under consistent lighting before approving the pair.
Bookmatch orientation Confirm that the two polished faces can be placed as mirror images across the intended joint. One slab rotated face-to-face relative to its partner, subject to the stone’s cut and finish Mark the top, bottom, finished face, and intended center joint on the slab photos.
Vein direction Identify the dominant vein flow and any prominent branches that should meet or mirror at the joint. Primary vein runs diagonally from the lower-left area toward the upper-right area on the layout Agree on the visual focal point; do not assume every natural vein will align perfectly across the seam.
Full-scale layout Place every finished panel, cutout, and edge on a measured slab drawing before cutting. Drawing scale: 1:1; record panel dimensions in millimeters Include finished dimensions, cut lines, joint locations, sink or appliance openings, and edge details.
Center-joint planning Set the seam location and account for the specified joint width and installation conditions. Example joint width: 2–3 mm, subject to the installer’s specification Show the finished joint on the layout and align the main visual feature before finalizing the cut.
Vein alignment tolerance Check whether the selected vein feature can meet across the joint without forcing an impractical cut. Use a project-specific alignment tolerance; a few millimeters may be a useful review reference Review the actual stone image and marked layout together; natural pattern variation prevents a universal tolerance.
Cutout placement Assess how sink, cooktop, outlet, or faucet cutouts affect the visible pattern and slab strength. Locate cutouts on the 1:1 drawing and keep required edge distances per the fabricator’s specifications Approve cutout positions only after checking both the vein composition and fabrication requirements.
Material allowance Allow for trimming, defects, vein placement, and the possibility that some areas cannot be used. Estimate from the approved layout rather than relying only on total surface area Have the fabricator confirm slab yield after mapping natural fissures, resin-filled areas, and other characteristics.
Dry layout approval Review the proposed cut pieces in sequence before they are permanently installed. Label pieces in order, such as A-left and A-right, with matching orientation marks Obtain approval of the labeled slab photos or physical dry layout before cutting and installation.
Installation coordination Keep slab orientation, seam position, and panel labels consistent from fabrication through installation. Use a single approved drawing with revision date and piece labels Share the approved layout with the fabricator and installer; recheck site dimensions before final fabrication.

Prepare the Surface and Set the Slabs in Sequence

A bookmatched marble feature begins with a stable, flat, dry substrate. Check the wall with a long straightedge and correct dips before lifting the stone. Remove dust, paint flakes, and loose material so the setting bed can bond evenly. Confirm that the structure can support the slabs, and use a qualified stone installer for heavy panels. Measure the opening, then dry-lay every slab on padded supports in its intended order. Turn neighboring pieces toward the center seam and compare the veins under the room’s actual lighting. Photograph the layout and mark each slab’s position with removable labels. Measure twice. This work is tedious, but it can prevent an expensive reversal.

Snap a centerline and set panels in the planned sequence, keeping edges aligned without forcing them. Use a setting material approved for the stone and substrate; unsuitable products can discolor marble. Keep joint widths consistent, and check plumb and face alignment after each panel. Support slabs as directed. Small shifts matter. If the seam looks wrong in the dry layout, pause and reconsider the sequence before setting anything. A bookmatch is a visual pairing, not a guarantee of identical veins; natural fissures, color shifts, and cutting tolerances can interrupt the reflection. Protect the finished face from scratches, and wait for the specified cure time before grouting or sealing.

How to Achieve a Bookmatched Marble Look in 2026

Prepare the Surface and Set the Slabs in Sequence

Illustrative active crew-hour estimates for a two-slab feature. Actual time varies with slab size, substrate condition, site access, and installation method. Allow additional time for adhesive curing as specified by its manufacturer.

Align, Secure, and Finish the Mirrored Marble Panels

To create a convincing bookmatched marble surface, begin with a dry layout on a clean, padded floor. Place the mirrored panels side by side and check how the veining crosses the center seam. Adjust their position before cutting or applying adhesive. A few millimeters can change the visual rhythm. Photograph the layout, then mark each panel’s top and seam edges with removable tape.

Small shifts matter. Prepare a flat, stable substrate and confirm both panels have matching thickness. Apply a stone-compatible adhesive as directed by its manufacturer, keeping it away from the visible seam. Set the panels gently, then use leveling clips or a straightedge to reduce lippage. Check the seam from several angles and wipe away squeeze-out before it hardens. Don’t force a vein match if the stone’s natural pattern varies; that can make the joint look less believable.

Once the adhesive cures, fill the seam with a color-matched stone filler suited to the marble and installation. Let it set fully, then refine the joint with the appropriate polishing method. Test any cleaner, sealer, or finishing product on an inconspicuous offcut first. Marble can react differently across slabs. I would inspect the surface in both daylight and raking light; small imperfections often show up only then.

Seal the Surface and Maintain the Bookmatched Look

Seal only after the marble is clean, fully dry, and free of installation residue. A penetrating sealer can slow liquid absorption, but it cannot make marble stain-proof or prevent etching from acidic spills. ASTM C503/C503M lists a maximum water absorption of 0.20% by weight for specified marble categories. That figure describes tested stone, not every slab; veining and mineral content vary. Check the slab’s technical data and test sealer on an offcut first.

Apply sealer evenly with a soft cloth, following its stated dwell time, then remove all excess. Pooled sealer can leave a cloudy film that disrupts the mirror-like veining. Let the surface cure before arranging objects or using the counter. A small test area matters.

The Natural Stone Institute’s care guidance recommends pH-neutral cleaners and prompt spill cleanup; wipe wine, citrus, and cooking oil rather than letting them sit. Use coasters and boards, but don’t expect them to prevent every mark. Some etching may remain, and that is a useful reminder: a bookmatched surface is stone, not a printed pattern. Recheck absorbency when water darkens the surface instead of beading. Seal again only when the stone’s condition and sealer instructions call for it.

FAQS

What does bookmatched marble look like?

Two neighboring slabs mirror their veins across a seam, like open pages. The reflection may not be exact.

How should I choose slabs for a balanced match?

Compare base color, vein direction, and background tone. Patterns can complement each other without being identical.

Should I review the full slab layout before cutting?

Yes. Place slab photos side by side and mark seams, sink openings, cabinet edges, and finished edges. Measure twice.

Can a sink cutout interrupt the vein pattern?

Yes. A strong vein may appear abruptly broken at a cutout. Check its position on the full-size layout.

How can lighting affect the match?

Review the slabs under consistent lighting, then check them in the room’s actual light. The color may feel different.

What should I check before installing marble panels?

Make sure the substrate is flat, dry, clean, and strong enough to support the slabs. Small dips matter.

What if the veins do not line up exactly?

Natural marble can shift, branch, or fade, even between neighboring slabs. The drawing is only a guide.

When should the installer pause during setting?

Pause if the seam looks wrong in the dry layout. Reconsider the sequence before setting the panels.

How should the slabs be positioned during installation?

Follow the planned order, align the edges without forcing them, and check plumb and face alignment after each panel. Small shifts matter.

When can the marble be grouted or sealed?

Wait for the setting material’s specified cure time. Rushing this step is tempting, but not wise.

Conclusion

How to achieve a bookmatched marble look begins with selecting two compatible slabs whose natural veining can create a balanced mirror image. Before installation, study the patterns, decide how the veins should meet, and create a full-scale layout to confirm the direction and placement of each piece. Careful planning helps avoid unexpected breaks in the visual flow and makes it easier to identify any adjustments needed before the slabs are set.

Prepare a clean, level surface, then install the slabs in the planned sequence. Align their edges and veins as closely as possible, secure the panels, and finish the joints for a smooth, continuous appearance. Once installation is complete, seal the marble with a suitable stone sealer to help protect it from stains and moisture. Regularly clean the surface with gentle, stone-safe products and address spills promptly to preserve the mirrored pattern and keep the marble looking its best.

Mason

Mason

Mason is a seasoned marketing professional with a deep expertise in the company's offerings and a passion for driving brand awareness. With a strong background in digital marketing strategies, he has an innate ability to connect with diverse audiences and effectively communicate product benefits.......